


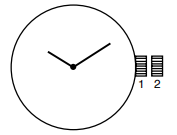
ANALOG INSTRUCTIONS
Time Setting
1. Pull the crown out to position 2.
2. Turn the crown to set the hour and minute
hands to the desired time.
3. Return the crown to position 1.
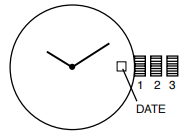
DATE MODELS
Date Setting
1. Pull the crown out to position 2.
2. Turn the crown either clockwise or counter
clockwise and set the date for the previous
day. The direction that moves the date
varies on different watch models.
Time Setting
1. Pull crown out to position 3.
2. Turn counter-clockwise to advance the time and continue until the day
changes to the present day.
3. Set to the correct time.
4. Push crown back to position 1
CHRONOGRAPH STOPWATCH VD54
(with date-VD53)
(1 crown/2 pushers)
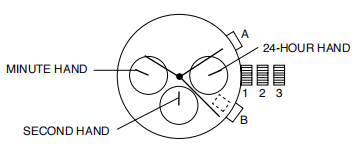
Time and Date Setting
1. Before setting the time, make sure the chronograph is stopped and set to
zero (12:00) position.
2. Pull crown out to position 2.
3. Turn crown clockwise until the previous day’s date is displayed.
4. Pull crown out to position 3 when the second hand is at the 12:00 position.
5. Turn crown to set time.
NOTE: The movement of the 24-hour hand corresponds to the hour and
minute hands. When setting the time be sure to check that the 24-hour
hand is set properly.
6. Return crown to position 1.
NOTE: When the crown is in position 2, do not press the pushers.
Otherwise the chronograph hands will move.
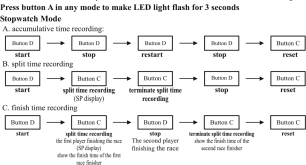
Chronograph
1. Press A to start/stop the chronograph.
2. Press B to reset to zero.
Split Time
1. Press B while the chronograph is running.
2. Press B again to return to the chronograph.
3. Press A to fnalize timing.
4. Press B to reset.
Chronograph Zero Reset
1. If either of the chronograph hands is not at the zero (12:00) position, pull
crown out to position 3.
2. Press A to move hands clockwise; press B to move hands counter
clockwise.
4. Return crown to position 1.
CHRONOGRAPH STOPWATCH VD55
(with date-VD57)
(1 crown/2 pushers)
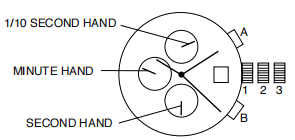
Time Setting
1. Pull crown out to position 3.
2. Set time by turning the crown clockwise.a
3. Push back to position 1 to start the watch.
Using the Stopwatch
1. Press A to start/stop the stopwatch.
2. Press B to control the split time and reset.
Stopwatch Hand Adjustment
1. Pull crown out to position 3.
2. Press A to reset the stopwatch 1/10 second hand to the “0” position.
3. Press B to reset the second and minute hands. The hands only move
clockwise.
4. With each press of A or B, the hands move one position. They move
quickly if the pushers are held down.
NOTE: If the stopwatch hands function improperly, pull out crown and
press A and B at the same time for over 2 seconds. When the pushers are
released, the stopwatch second and 1/10 second hands will spin around
and return to “0.” This will indicate that the internal circuit has been reset.
Date Setting (on some models only)
1. Pull crown out to position 2.
2. Turn clockwise until desired date appears in window.
3. Push crown back to position 1.

Time/Day Setting
1. Pull crown out to position 3.
2. Rotate crown to set time.
3. To adjust day, continue rotating crown 24 hours until day is correct.
4. Return crown to position 1.
Date Setting
1. Pull crown out to position 2.
2. Rotate crown clockwise until the correct date is shown in the date window.
3. Return crown to position 1.
Chronograph Operation
1. Press A to start/stop the chronograph.
2. Press B to reset.
NOTE: After 2 hours of continuous running, the chronograph will
automatically stop and reset to save the battery.
Split Time
1. Press B while the chronograph is running.
2. Press B again to return to the chronograph.
3. Press A to finalize timing.
4. Press B to reset.
CHRONOGRAPH JS15, JS25
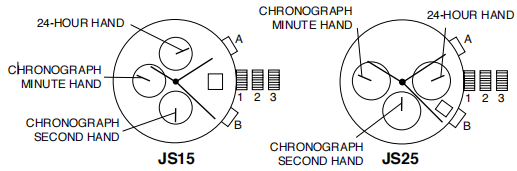
Time and Date Setting
1. Pull crown out to position 2.
2. Rotate crown clockwise until the previous day’s date is shown in the
date window.
3. Pull crown out to position 3.
4. Rotate crown clockwise until the correct date is shown in the date window.
5. Continue to rotate crown to set correct am/pm time.
NOTE: The movement of the 24-hour hand corresponds to the hour and
minute hands. When setting the time be sure to check that the 24-hour
hand is set properly.
6. Return crown to position 1.
NOTE: When the crown is in position 2, do not press the pushers.
Otherwise the chronograph hands will move.
NOTE: Do not set the date between 9:00 p.m. and 1:00 a.m. to ensure
accuracy
Chronograph
1. Press A to start/stop the chronograph.
2. Press B to reset to zero.
Chronograph Zero Reset
1. If either of the chronograph hands is not at the zero (12:00) position, pull
crown out to position 3.
2. Press A to move hands clockwise; press B to move hands counter
clockwise. Each press of A or B will move the chronograph hands by
one increment/decrement. Or press and hold A or B for fast increment/
decrement.
3. When both hands are in the zero position, reset time and return crown to
position 1.
NOTE: Chronograph minute hand will synchronize with chronograph
second hand during chronograph zero reset.
DIGITAL X1

AUTOMATIC WINDING MOVEMENTS
A timepiece with an automatic winding movement obtains the power to
wind itself by the movement of your wrist, there is no battery. Therefore,
not wearing the timepiece for several consecutive days could exhaust the
power reserve. If your watch stops, it is recommended that you manually
wind the movement by rotating the crown clockwise to achieve the
necessary power reserve.
It is important that your timepiece is adjusted to match the size of your wrist.
A loose fit may result in a loss in capacity of the timepiece to wind itself.
When fully wound, your timepiece has a power reserve of approximately
38 hours.
OPEN HEART TY605
(23 Jewels, 1 crown)

Time Setting
1. Pull crown out to position 2.
2. Turn crown clockwise to rotate hour
and minute hands to desired time.
3. Push crown back to position 1.
Use Precautions - Resistance to Water
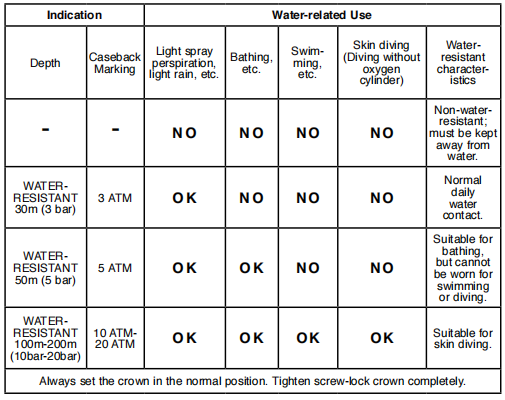
• Clean your watch with a soft cloth and water only. Do not submerge your watch under water
unless it is water rated (see caseback).
• After salt water use, rinse watch under tap water and wipe dry with a soft cloth.
• Metal watch bands should be washed periodically to keep them looking beautiful. Clean with
a soft brush dipped in mild, soapy water. Be sure to wipe dry thoroughly with a soft cloth.
TWO (2) YEAR INTERNATIONAL WARRANTY
The SKYLINE warranty policy is automatically in effect upon purchase of any
SKYLINE products. SKYLINE grants a two (2) year warranty period on its
watches. The warranties guarantee the buyer that the products meet the
standards of usability, reliability and durability.
The warranties only apply to products that are bought on our website
watchskyline.com or through one of our official retail channels. To claim
under our warranties, the buyer needs to present the original purchase
documentation received from our website or an official retailer.
The warranties do not apply in case of: theft or loss; intentional damage;
damages as a result of improper usage such as scratching, bumping or
falling; normal wear and tear or aging of the used materials; or damages as a
result of neglected care.
The warranty on a watch relates to the movement and not to other parts
such as the battery, the glass or the strap. Wear traces visible on the watch,
must be considered as normal effects of usage. The effects of perspiration
on the strap differ from one person to another, due to the differences in
acidity.
SKYLINE watches are 3 ATM Water Resistant: this means that the watch is
protected against minor splashes of water. 3 ATM water resistant SKYLINE
watches cannot be worn during showering, bathing, swimming or diving.
SKYLINE watches should not be exposed to more than minor splashes of
water or to chemical substances such as perfume, cosmetics and cleaning
products.
The warranties no longer apply in case a third party performed repair works or
other works on the product, without prior written permission by SKYLINE.
Shipment costs for a return shipment after a warranty request or repair request
(for defects occurring after the buyer has used the product), will be borne by the
buyer.
In case of questions regarding returns and warranty, the buyer can always
contact the SKYLINE customer care team via the website watchskyline.com.